Building a toy car track out of cardboard is both fun and educational. John Smith, a toy design expert, emphasizes, "Creativity is key when using simple materials." His words resonate with anyone eager to dive into crafting.
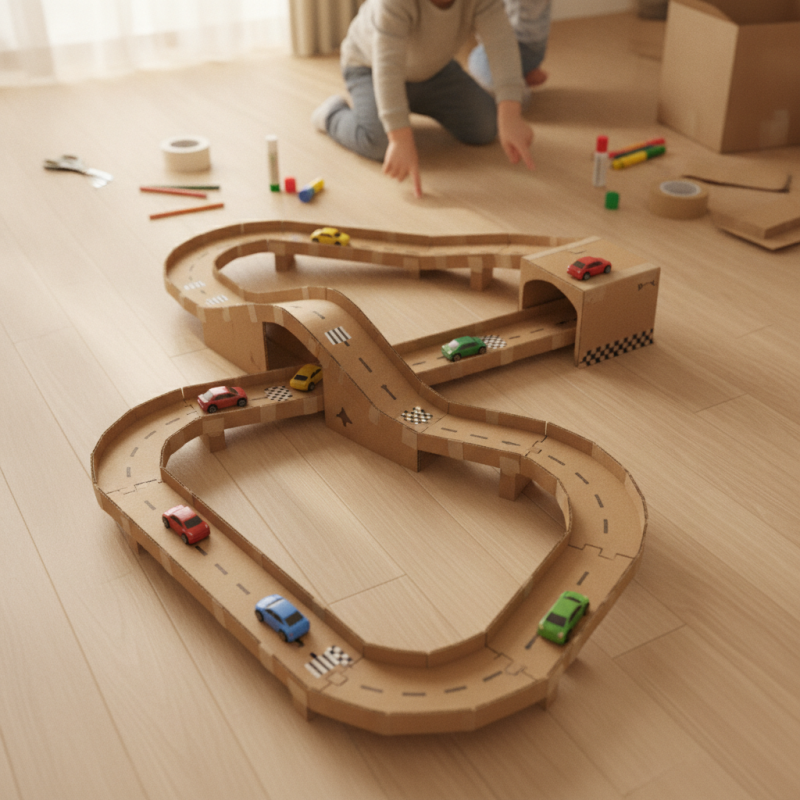
Creating a track from cardboard encourages hands-on learning. Children can explore geometry and engineering in a playful way. Cardboard is an accessible medium that can lead to endless possibilities. Imagine a winding road or a loop-the-loop! Yet, many face challenges in execution.
Planning is essential. You might struggle with stability or design. Experimenting is part of the journey. There's no perfect blueprint. The process itself teaches problem-solving and adaptability. Embrace imperfections; they often lead to unexpected innovations. Understanding how to build a toy car track out of cardboard can be a rewarding adventure for all.
Creating a cardboard toy car track can be a delightful project. Before you start, gather your materials. Cardboard sheets are essential. A standard box can provide enough material for multiple track sections. Use scissors or a utility knife for precision cutting. You'll need a ruler for measured lines and a pencil for marking. Non-toxic glue or tape will help secure the track pieces.
In addition to cardboard, consider adding paint for flair. Studies show that vibrant colors can boost children’s creativity. A report by the National Institute for Play highlights the importance of engaging play environments. Textures can add another layer of sensation. Use fabric scraps or textured paper to make the track more interactive.
While building, aim for straight sections and curves that flow smoothly. Remember, imperfections can lead to unique designs. Perhaps some areas don't align perfectly or a curve is too sharp. Reflect on these moments as learning opportunities. They add character to your creation. Embrace the process, and let the fun of building guide you.
Designing a cardboard toy car track can be a rewarding adventure. Start by gathering materials like cardboard boxes, scissors, and tape. Create a rough sketch of your track layout on paper. Think about curves, slopes, and intersections. This will help visualize the overall design.
Once you have your plan, measure and cut pieces from the cardboard. Use a ruler for straight edges. When assembling, allow for some flexibility to adjust the layout. Tracks can be tricky. Sometimes, what looks great on paper won’t work in practice. Don’t be afraid to experiment; mistakes are part of the fun.
Remember to attach the pieces securely. Hot glue can provide strong connections, but be cautious with it. After constructing the track, test it with your toy cars. Observe how they navigate the twists and turns. Adjust the layout if necessary. Sometimes, the adjustments can lead to surprising improvements in playability. Your track should be enjoyable, and finding that balance can be a learning experience.
Building a toy car track out of cardboard can be fun yet challenging. To create a smooth track surface, you need to focus on cutting and shaping the cardboard properly. Start by selecting sturdy cardboard. It should be thick enough to withstand play but light for easy manipulation.
To cut the cardboard, use a sharp craft knife. A ruler helps keep your cuts straight. Cut along nice straight lines for the track's edges. If the curves are needed, trace the shape first. This method provides a guide and reduces mistakes. Keep in mind that precision matters. Even slight deviations can affect how the cars roll.
Shaping the track requires creativity and patience. You may need to reinforce curves or inclines with extra layers. When joining pieces, using glue or tape ensures durability. Test the track regularly as you build. Sometimes, the track may not hold up as expected. Adjusting angles or adding supports can solve issues. Each experiment offers lessons to guide your next creation. Embrace imperfections; they often lead to the most enjoyable designs.
Building a toy car track from cardboard can be a fun and engaging activity. To enhance stability, focus on the track's base. Use thicker cardboard sheets for the bottom layer. This provides a sturdy foundation. Consider adding cross braces under the track. This simple method can prevent sagging and create a more even surface for the cars to run on.
For durability, pay attention to joints and edges. Use strong adhesive to secure connections. Tape can provide additional support, but make sure it lies flat. Over time, joints may weaken. Regularly check them to maintain track quality. If you notice any issues, reinforce them quickly. Creating sharp turns may also compromise stability. Experiment with gentle curves instead. While they might require more planning, they significantly improve performance.
Remember that imperfections can make the project more enjoyable. Maybe a bump on the track can create unexpected challenges for the cars. Reflect on what works and what needs improvement. This trial-and-error process is where creativity shines. Ultimately, ensuring stability and durability can lead to hours of fun on your cardboard track.
Creating a toy car track from cardboard can be a fun project. To enhance your track, consider adding decorative elements. Colorful paint can bring life to a simple design. Use bright colors to mark lanes or create fun intersections. Simple patterns like stripes or polka dots can make the track visually appealing.
You can also add small cardboard buildings or trees. This creates a mini cityscape for your toy cars. Even tiny details, like windows or doors drawn with markers, can add charm. Keep some structures simple to avoid clutter. Too much detail can make it overwhelming. Remember, the goal is playful creativity.
Incorporating removable elements can bring flexibility. Use Velcro to attach small accessories. This way, you can change the scenery easily. However, some items may not stay in place well. Test different materials to find what works best. Your track can evolve as new ideas emerge. Enjoy experimenting with various designs!
: Gather cardboard boxes, scissors, tape, and a ruler for straight edges.
Create a rough sketch on paper, considering curves, slopes, and intersections for better visualization.
Don’t hesitate to experiment and adjust. Mistakes lead to fun discoveries and improvements.
Attach pieces securely with tape or hot glue, but handle hot glue carefully to avoid injuries.
Use colorful paint, patterns, and small cardboard buildings to enhance its visual appeal.
Incorporate removable elements like Velcro attachments for easy modifications and adjustments.
Keep structures simple. Too many details can clutter the layout and distract from play.
Testing reveals how cars navigate the track. Adjustments can significantly enhance the fun and playability.
Yes, adding miniature buildings or landscapes can create an engaging cityscape for imaginary play.
Bright colors are effective for marking lanes. Experiment to see what appeals most to you.
This article provides a comprehensive guide on how to build a toy car track out of cardboard, making it accessible and fun for creators of all ages. It begins by listing the necessary materials, ensuring readers have everything they need to get started. The step-by-step guide offers insights into designing a unique track layout, allowing for creativity and personalization.
Moreover, the article details effective techniques for cutting and shaping cardboard, crucial for achieving precise and clean edges. Tips for assembling the track focus on enhancing stability and durability, ensuring that the raceway can withstand enthusiastic play. Lastly, it presents imaginative ideas for decorating and enhancing the track, transforming a simple cardboard creation into an engaging play environment. Overall, this guide makes the process of building a toy car track both enjoyable and rewarding.
Hoopla Toys